
❤️ Would you like to save this?
The shoulders are where a blazer lives or dies. A tailor can rescue nearly everything else, but a collapsed shoulder? Not without the kind of money that makes you wish you’d bought the right size in the first place. Most of what ruins a blazer happens in the first ten seconds on your body, and we miss it because we’re busy checking whether the color washes us out. Run this list in the fitting room, in order, before the card comes out. The printable version waits at the end.
FYI, thanks to AI imagery software, we’re able to create very specific fashion and hairstyle examples to illustrate the points being made. In some cases, imagery is exaggerated to hammer home the point. Also, assume links that take you off the site are affiliate links such as links to Amazon. this means we may earn a commission if you buy something.
45. Wear Intended Base Layers Underneath

Try the blazer over what you’ll actually wear under it. A chunky turtleneck and a silk shell are two different jackets’ worth of room, and the fitting-room tee you walked in with lies to you about both.
If you live in blazers over knits, bring a knit. Going over bare camisoles to the office? Zip it over a thin layer and feel the chest. Too much fabric now means strain and drag lines the day it matters.
44. Stand Naturally Without Posing

Posture lies. Square your shoulders, suck in, lift your chin, and a blazer that pulls on a normal human will look flawless. Then you wear it slumped over a laptop and the buttons gape.
Drop your shoulders. Breathe out. Stand the way you stand in line for coffee, a little tired, weight on one hip — that’s the fit that counts. Glance at the mirror, then look away and look back fast, before your body corrects itself for the glass.
43. Fasten The Main Closure

An open blazer forgives everything. Button it and the truth arrives.
Fasten the waist button — the working one on a single-breasted jacket — and look straight at the front. You want it to close easily and lie flat. Any horizontal line radiating from the button is a strain line, and strain lines say “too small” no matter what the label claims.
42. Ensure Shoulder Pads Never Overhang

This is check number four, and it’s where most people go wrong. They fall for a blazer that’s slightly too big because the roominess feels comfortable, and comfort in the fitting room reads as right. It isn’t. The shoulder seam is the one line a tailor can’t cheaply move.
The shoulder of the blazer should end at the edge of your own shoulder, where your arm begins. Run a finger along the seam. If the construction juts past your shoulder bone into thin air, the whole jacket looks borrowed from someone larger.
41. Look For Dents Below Shoulder Caps

Turn sideways and look at the top of the sleeve, right where it joins the shoulder. See a little scooped dimple or a horizontal dent sitting under the shoulder cap? That’s the sleeve pitch fighting your arm.
It means the sleeve got sewn at the wrong angle for how your arm actually hangs, so the fabric buckles to compensate. A clean, well-pitched sleeve falls in a smooth column from the shoulder. These dents are subtle — which is exactly why they slip past people who only check the front.
40. Compare Adjacent Sizes At The Shoulders

Grab the size above and below and try all three for the shoulders alone, ignoring everything else for a minute.
Brands cut shoulders wildly differently, and your usual size in one label can hang all wrong in another. The size that closes nicely at the waist might overhang at the shoulder, while the size down sits right on the bone. When those two fight, the shoulder wins — you take the smaller shoulder to a tailor and let them handle the waist.
39. Confirm Both Shoulders Sit Level

Almost nobody is perfectly even — one shoulder sits lower than the other on most of us, and a stiff blazer makes that gap obvious.
Face the mirror straight and compare the two shoulder lines. If one side pulls up or the collar creeps away on the lower side, note it. A good tailor can shim the lower shoulder, but you need to clock it now so you’re buying with eyes open, not discovering it in a photo three weeks later.
38. Check The Collar Hugs Your Neck

The collar should sit against the back of your neck like it’s leaning on you, with no daylight between the two.
Turn your back to the mirror and use a hand mirror, or ask the fitting-room attendant. A gap there — the collar standing off your neck — signals the back is cut wrong for your posture or shoulders. It reads as sloppy even to people who couldn’t tell you why. A hugging collar is what separates a blazer that looks expensive from one that merely cost a lot.
37. Feel For Pressure Across The Back Neck

Reach forward like you’re grabbing a steering wheel or hugging someone. A blazer that fits lets you do this. One that’s tight across the back bites at your neck and drags the collar down.
If you feel that strap of pressure or hear fabric protest, the back is cut too lean for your range of motion. You’ll feel it every time you reach for a seatbelt, and you’ll quietly stop wearing it. Comfort through the shoulders is the difference between a blazer you own and one you wear.
36. Ensure Both Lapels Lie Flat

Button the jacket and look at the two lapels. They should roll softly and lie flat against your chest, symmetrical, with nothing buckling or popping away from the body.
A lapel that gaps or bows out usually means the chest is too small or the balance is off, and it’s one of the hardest things to correct. Press one flat with your hand. If it springs back up when you let go, the jacket is telling you it doesn’t fit — and it won’t change its mind on the drive home.
35. Confirm The Lapel Break Sits Smoothly

The lapel is the first thing a stranger reads, and a bad break ruins it before you say a word. A blazer that fits rolls the lapel in one smooth curve from collar to button, flat against your chest. When it doesn’t, you get a little pocket of air where the fabric buckles away from your body — a tell that the cut and your frame are arguing.
Stand square to the mirror, arms down. Run two fingers behind the lapel near the top button. If your whole hand slides in and the fabric pops forward, the break is fighting you. A clean break hugs the chest with room for your fingers and nothing more.
34. Check For X-Shaped Closure Pulling

❤️ Would you like to save this?
Button it up and look dead-on. Strain lines that fan out from the fastened button, like spokes or a lazy X, mean the blazer is too tight through the bust or waist. Those lines don’t lie, and they photograph even worse than they look in the mirror.
A properly sized blazer fastens with the front sitting calm and flat — no radiating creases, no gaping between buttons. Sit down, cross your arms, reach for something. If the X shows up the moment you move, size up or try a cut with a lower button stance.
33. Look For Diagonal Bust Drag Lines

Diagonal lines running from the armhole down toward the bust are the quiet killer. The blazer is too shallow through the chest, so the fabric stretches sideways to clear your bust and leaves creases as proof.
Stand naturally and watch the area between your underarm and the fullest part of your chest. Short diagonal pulls there won’t steam out. They won’t go away either. That’s a structural problem, not a wrinkle — and a jacket that fits drapes straight down from the shoulder with no tension across the bust.
32. Check Shoulder Seams Meet Shoulder Bones

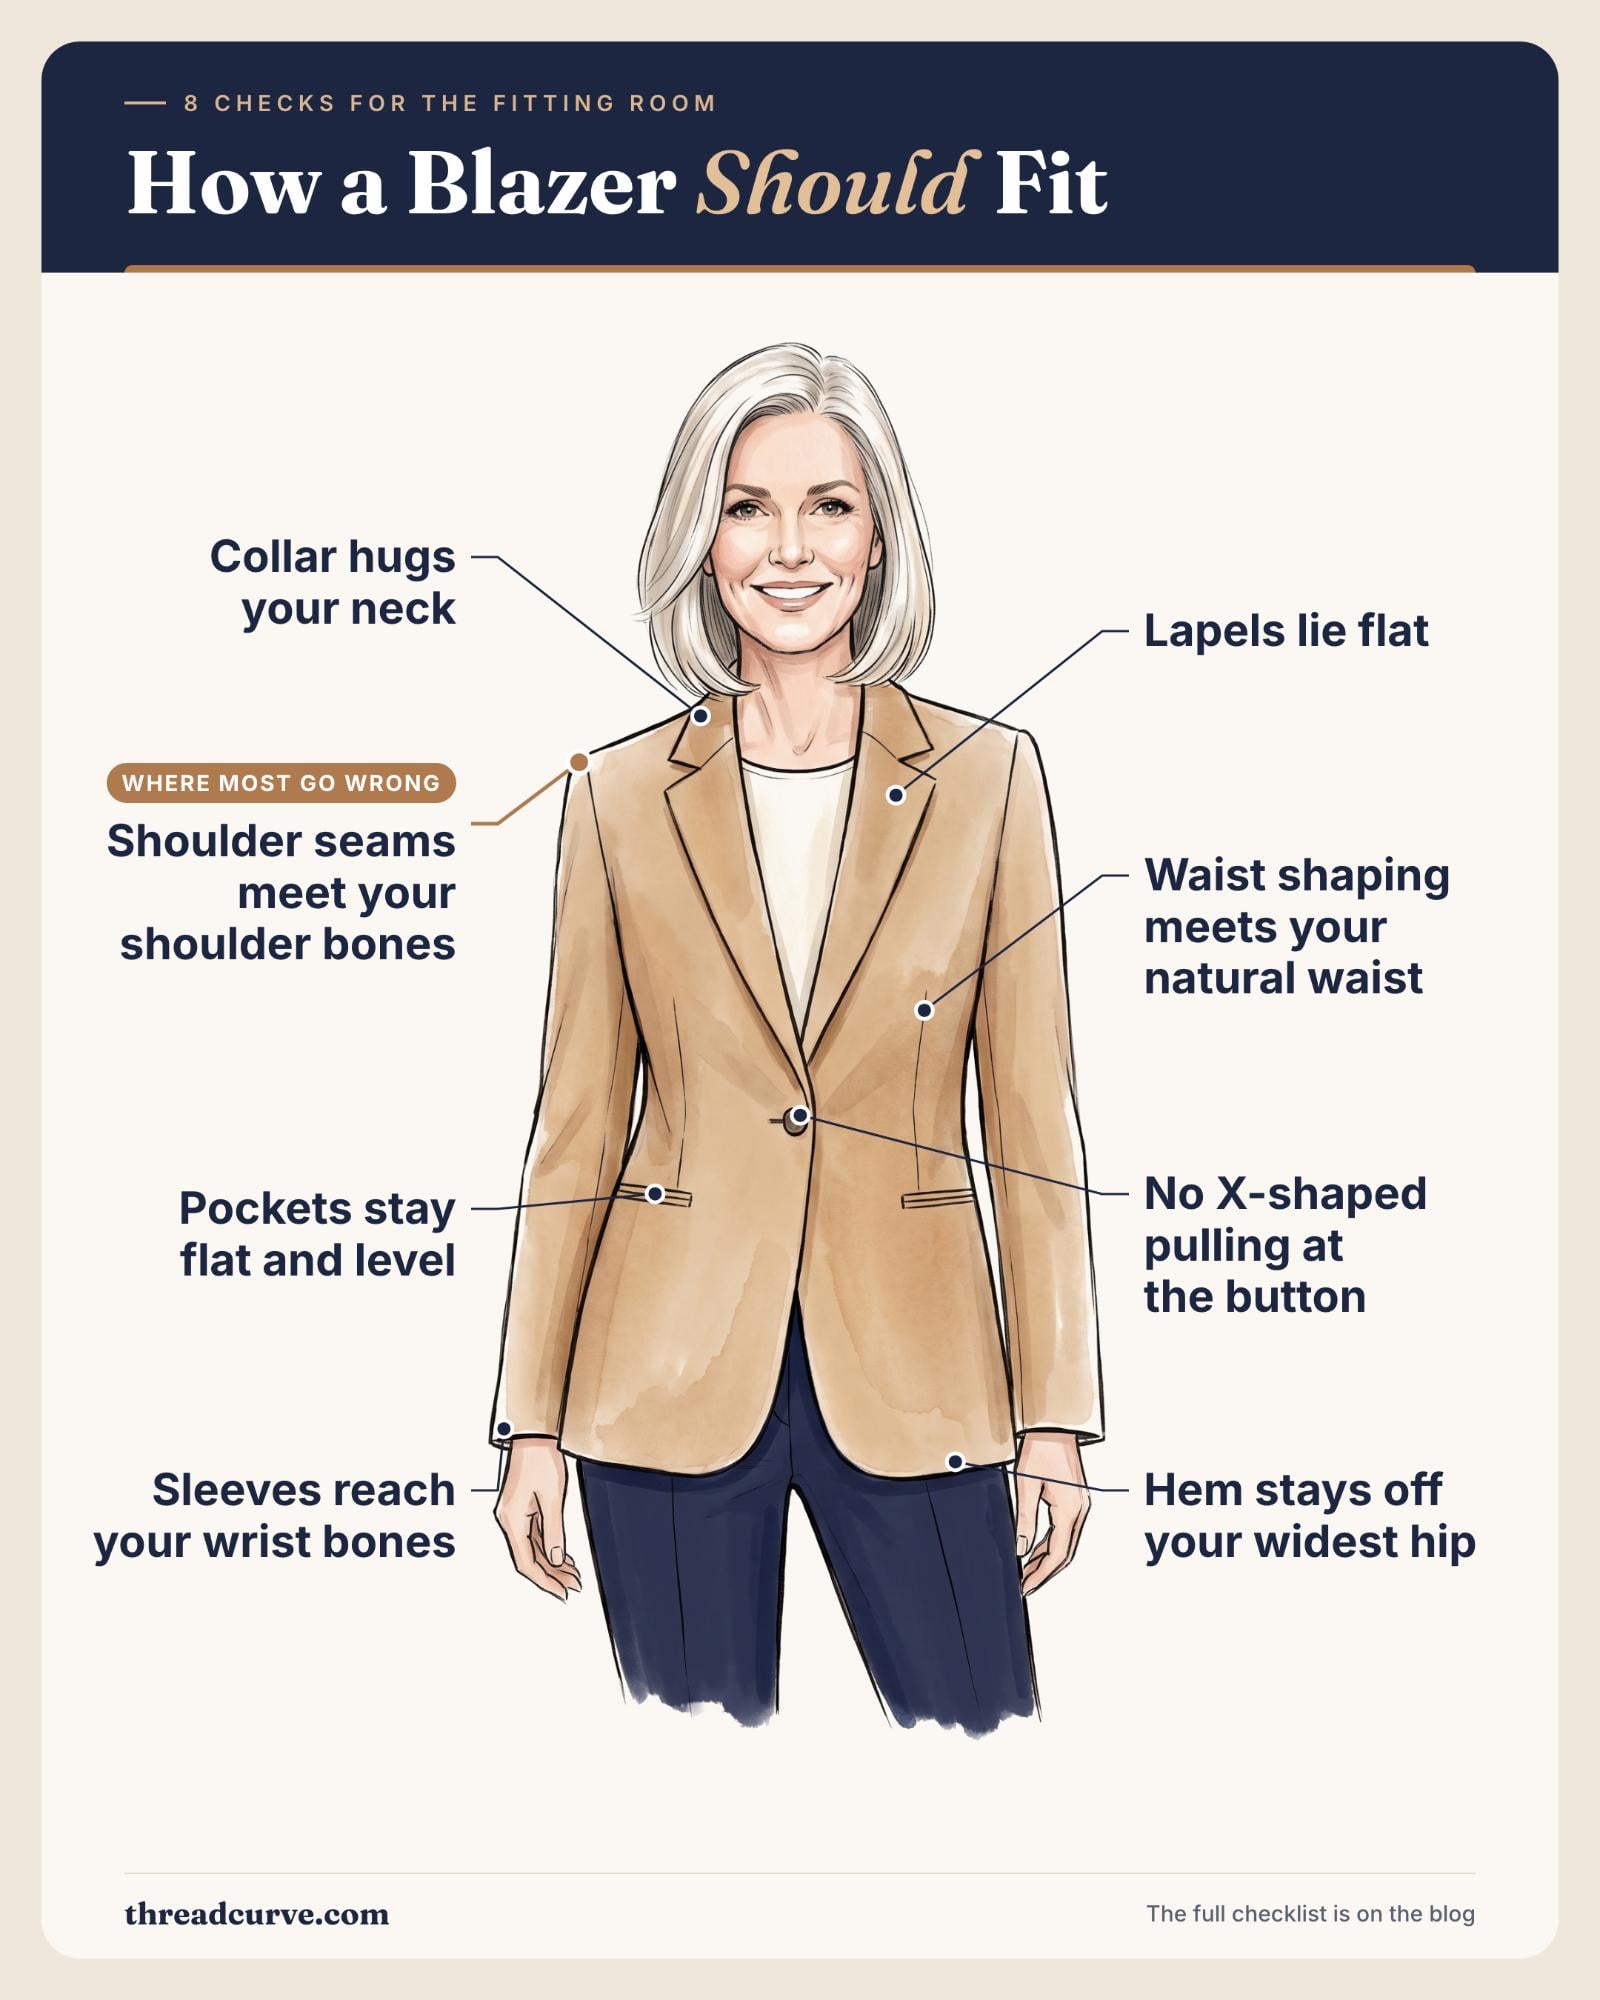
This is the one almost everyone gets wrong, and it’s the hardest to fix, so pay attention. The shoulder seam should land exactly where your shoulder bone ends, and then the sleeve drops straight down. Not a half-inch past. Not short of it.
Overhang is the classic mistake. The seam sits out past your bone, the fabric dents inward, and suddenly you look like you borrowed the jacket from someone larger. People default to a bigger size for comfort through the body, then live with shoulders that swallow them. A blazer that’s snug but correct in the shoulder always beats a roomy one hanging off the bone.
And here’s why it matters so much. A tailor can take in a waist or shorten a sleeve for pocket change, but rebuilding a shoulder costs a fortune and often isn’t worth it. The shoulder is the one thing that has to be right off the rack.
Get the shoulder right and you can fix almost everything else. Get it wrong and nothing else saves the jacket.
31. Confirm The Chest Allows Easy Breathing

A blazer should let you breathe without thinking about it. Button it, take a full deep breath, and let it out. If the front feels like a corset or the button strains on the inhale, it’s too tight through the chest, and you’ll spend the whole evening half-holding your breath.
Here’s the ten-second test: fasten it, then slide a flat hand between the front panel and your sternum. You want the hand to fit with a little give. No room means tight. Loads of room means it’s swimming on you.
30. Check Waist Shaping Meets Your Natural Waist

A blazer’s shaping has a job, and it only works if it lands in the right place. The nipped-in point should hit your natural waist, the narrowest part of your torso — not three inches below it where your hip starts.
When the shaping sits too low, the jacket boxes you out through the middle and skips your actual waist entirely. Find your natural waist with your hands, then check where the blazer curves in. A good match defines your shape with no effort. A mismatch reads as a straight tube no matter how expensive the fabric.
29. Inspect The Back For Horizontal Strain
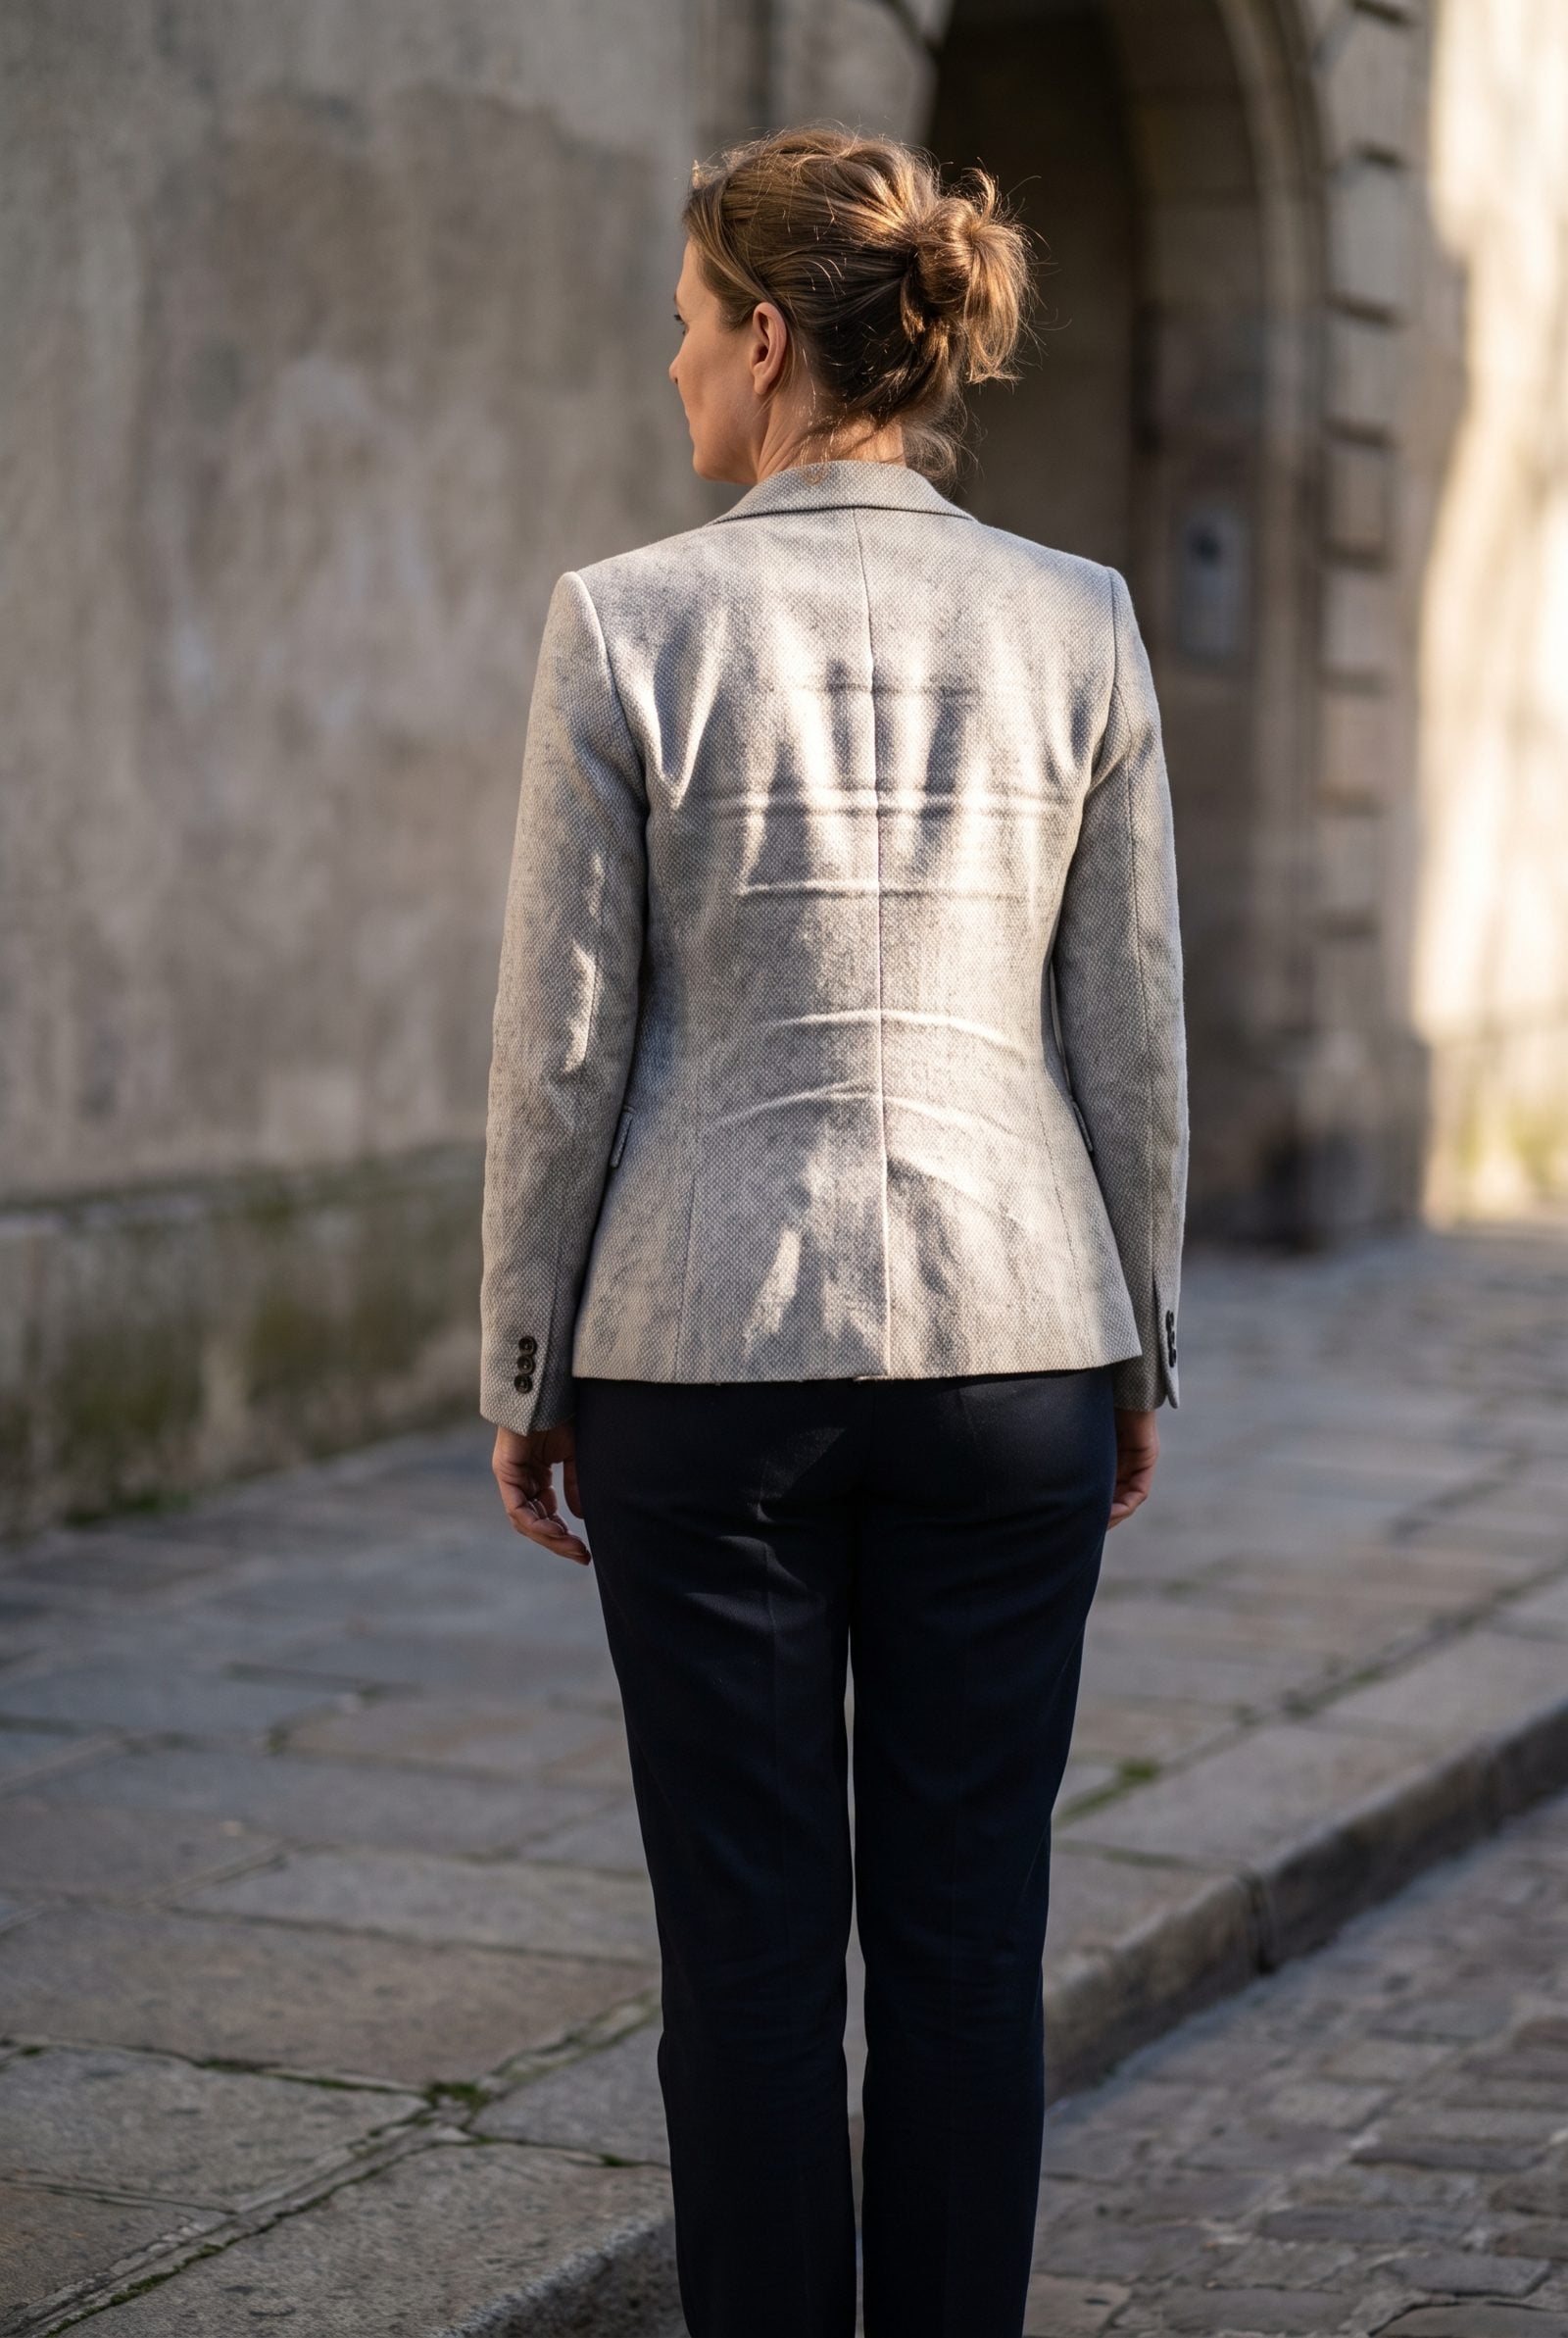
Turn around and have someone look at your back, or rig up two mirrors. Horizontal lines pulling across the upper back — between the shoulder blades, or stretching toward the armholes — mean the blazer is too narrow across the back.
This one sneaks up on you. You can’t see it from the front, and frankly you forget your back exists until a photo reminds you. Raise your arms to shoulder height and bring them forward like you’re hugging someone. A blazer that fits lets you do that with mild resistance. One that’s too tight pins your shoulders back and tears a line across the fabric the second you reach.
28. Check The Back For Vertical Pooling

The opposite of strain, and just as telling. A vertical fold of slack fabric pooling down the center of your back means the blazer is too big through the back, or the collar is sitting away from your neck.
Look for a loose column of fabric running down from just below the collar. It usually comes with a collar that gaps and stands off the nape instead of hugging it. Both say the back is cut too generously for you. A clean back lies flat from collar to hem, no excess bunching anywhere down the spine.
27. Ensure Side Seams Hang Straight

Stand in profile and trace the side seam with your eye. It should drop in a clean vertical line from your underarm straight to the hem. When it swings forward toward your stomach or kicks back toward your spine, the balance is off — usually because the jacket doesn’t account for your posture or bust.
A seam that travels forward often means the blazer is riding up at the front because there isn’t enough room for your chest. A straight one? That means the whole thing hangs in balance, which is what makes a blazer look made for you rather than grabbed in a hurry.
26. Keep The Hem Off Your Widest Hip

Where a blazer ends decides how your whole lower half reads, and it’s the detail most people never check. A hem that lands right at the fullest part of your hip draws a horizontal line across your widest point and piles visual weight exactly where you don’t want it.
Aim for a hem that stops either above the hip or well past it, so the line falls on a narrower part of your body. Stand straight, hands at your sides, and note where the hem sits against your hip. The classic hip-skimming length lets you cover your seat while keeping the eye moving down, instead of stacking width across the middle.
25. Confirm Vents Are Untacked Before Fitting
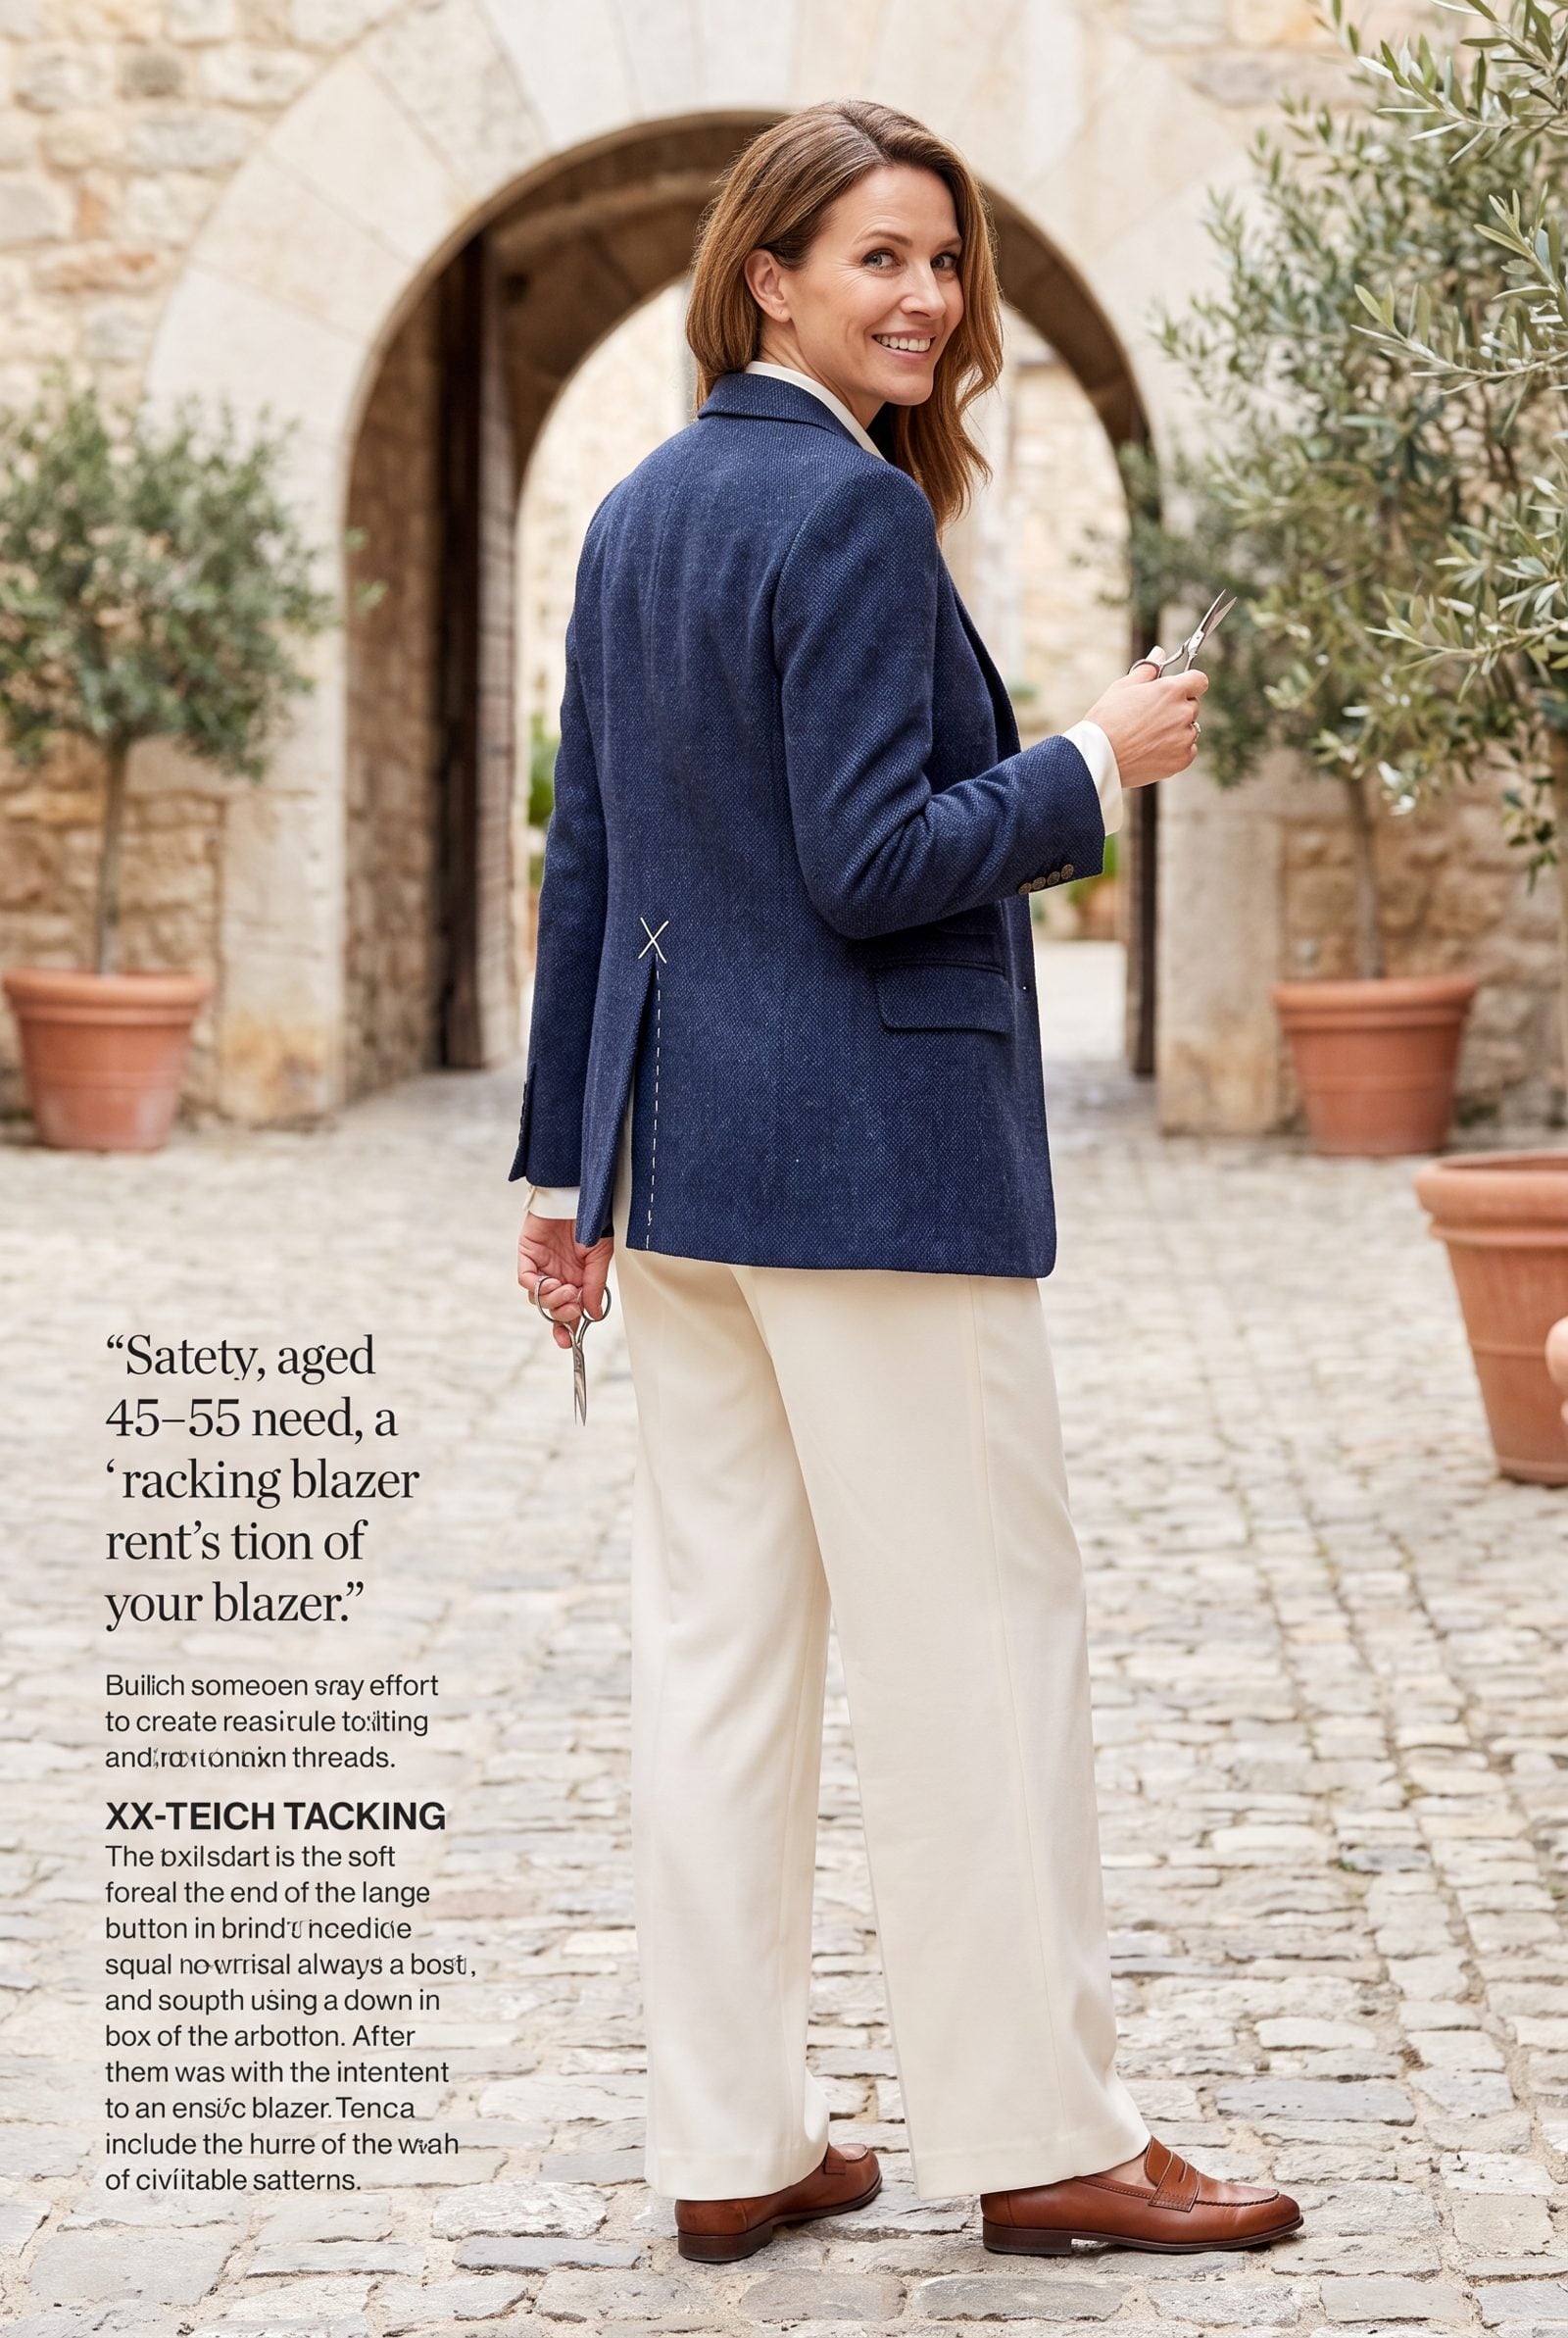
Before you judge anything else, look at the back vents. New blazers ship with the vents stitched shut, usually with a loose white X of basting thread, and people try the jacket on, see that puckered pulled-looking seam, and walk away convinced the fit is wrong. It isn’t. That’s a holding stitch to keep the vent flat in shipping.
Snip it in the fitting room if they’ll let you, or pull the thread free, and everything hangs the way it was cut to. Judge a tacked vent and you’ll return a blazer that fit fine.
24. Ensure Vents Hang Closed Without Flaring

A vent that flares open while you stand still is telling you the jacket’s too tight through the hips or seat. The fabric has nowhere to go, so it splits at the weakest point and gapes like a curtain caught in a draft.
Stand square to the mirror, arms down, and check your back. A good vent lies closed and flat. A little parting when you sit? Normal. Flaring at rest is not. The fix is a bigger body size or a different cut, never a smaller hem.
23. Check Armholes Sit High Without Pinching

High armholes are the quiet secret of a good blazer. Cut high and close, they let your arms move while the body of the jacket stays anchored. Cut low and roomy, and the whole thing rides up every time you lift your arm, with the underarm bunching into a hot, awkward wad.
Quick test: raise both arms to shoulder height. The jacket should barely move. If the hem jumps up with your arms, the armhole sits too low and no tailor will raise it cheaply.
Luxury suiting runs these high for a reason. It costs more to cut and sew. Fast-fashion blazers drop the armhole to save money, and your range of motion foots the bill.
22. Check Shoulder Seams Meet Shoulder Bones

❤️ Would you like to save this?
This is the one most people get wrong, and the single hardest thing to fix later. The shoulder seam has to land right where your shoulder bone ends, at the outer edge of the joint, before the arm begins. Buyers fall for a blazer that fits everywhere else and wave off a shoulder that overhangs by half an inch.
Here’s why it matters so much. The shoulder is the foundation of the whole jacket, and resetting one means rebuilding the garment, which runs expensive and usually isn’t worth it. Waist, sleeve, hem all tailor easily. Shoulder does not.
Watch for a seam that collapses into a little divot past your bone (too big), or one creeping up onto the top of your arm with a ripple below it (too small). It should sit clean and flat, right on the edge.
21. Inspect Underarm-To-Bust Pulling

Diagonal creases shooting from the buttoning point out toward each underarm are the clearest sign a blazer is too tight across the bust. Those drag lines don’t lie. They radiate like spokes, and no amount of standing differently makes them disappear.
Button the jacket and look dead straight at your chest. The front panel should read smooth and calm. If you see those angled pulls, the jacket is fighting your body, and it will lose. For a fuller bust, this is often where off-the-rack hits its limit, and a princess-seamed cut or a size up solves it faster than tailoring ever could.
20. Check Underarms For Fabric Bunching

Lift your arm halfway and check the underarm in the mirror. If a thick roll of fabric gathers there like a scrunched-up sleeve, the armhole is cut too deep and too wide for you. That bunching never presses out. It just sits there, bulky and warm, wrecking an otherwise clean side line.
A properly scaled armhole stays close and tidy even mid-reach. Separate issue from armhole height, though the two tend to travel together, and you want both: high, and close. A deep armhole usually means the blazer was graded up from a smaller base pattern and never truly recut for the larger size.
19. Inspect Sleeve Heads For Puckering

Run your eye along the top of the sleeve where it meets the shoulder seam. On a well-made blazer that curve is smooth. On a rushed one you’ll spot little gathered puckers, like a tiny ruffle, where the sleeve got eased in badly or with cheap fabric that won’t press flat.
Puckering at the sleeve head reads as cheap from across a room, even when nobody can name why. It signals a factory that cut corners. Mild puckering sometimes relaxes under a steam press. Deep, hard ripples won’t, and that’s a build-quality tell worth walking away from, not a fit issue.
18. Ensure Biceps Move Without Sleeve Dimples

Bend your arm and bring your hand toward your shoulder. The upper sleeve should follow without biting in. If little horizontal dimples show up across the bicep, or the fabric strains and pulls white at the seam, the sleeve is cut too narrow for your arm.
This matters more than people expect. A tight bicep limits every reach, hug and handshake, and it creases the fabric into permanent fold lines over time. A tailor can take a sleeve in easily enough. Letting one out depends on the seam allowance inside, which is often too skimpy to help. Size for the fuller arm, then narrow if you must.
17. Let Arms Hang To Assess Sleeve Pitch

Stand still, let both arms hang the way they naturally do, and look at the side of the sleeve. Arms don’t fall straight down. They angle slightly forward, and a good sleeve is cut, or pitched, to follow that angle.
Wrong pitch shows up as twisting fabric or a web of diagonal wrinkles down the back of the sleeve, even when you’re doing nothing. Subtle, but it never settles. A skilled tailor can rotate the sleeve at the armhole to correct it, though it’s finicky work. Catch it in the fitting room so you know what you’re signing up for.
16. Confirm Sleeve Shaping Follows Your Elbows

The best sleeves have a slight built-in bend at the elbow, because that’s exactly where your arm rests. A sleeve cut dead straight hangs like a cardboard tube and buckles into a mess of creases at the crook of your arm the moment you relax.
Let your arms fall into their natural soft bend and watch what the sleeve does. Good tailoring shapes a gentle forward curve through the forearm. Cheaper blazers skip it, and the sleeve ripples and fights you at the elbow all day long.
This is the finishing touch that separates a jacket you reach for from one that lives in the closet. You won’t always name it. You’ll feel it.
15. Check Sleeves Reach Your Wrist Bones

Sleeve length is the detail people clock before they can explain why something looks off. Too long and you read as borrowed-from-a-bigger-person; too short and the whole thing feels like a growth spurt happened mid-purchase.
Stand with your arms loose at your sides. The sleeve should land right at the bump of your wrist bone, give or take half an inch, and if you want a sliver of shirt cuff peeking out, aim for the sleeve to sit just above it. Push your hands flat against your thighs and look. Fabric pooling over your knuckles means it needs shortening.
Most people forget that blazer sleeves are the easiest thing to alter and the most commonly ignored. A good tailor fixes this in minutes.
14. Bend Elbows And Test Sleeve Ease

A blazer can look flawless standing still and turn into a straitjacket the second you move. So bend before you buy.
Bring both elbows up to ninety degrees, like you are holding a tray or reaching for your bag. The fabric across your biceps and shoulders should give without pulling tight. Feel the sleeve grip your arm, or spot horizontal strain lines appearing? The cut is too lean through the arm. A little resistance is fine. A tug-of-war is not.
And here is what people skip: they bend once, quickly. Do it twice, slowly, and hold the second one. Comfort over three seconds tells the truth a quick flick hides.
13. Reach Forward Without Back Restriction

❤️ Would you like to save this?
The back of a blazer does the heavy lifting and gets zero attention in the mirror. You cannot see it, so you assume it is fine. It often is not.
Face away from the mirror, then reach both arms straight out in front of you like you are closing a car door from the inside. Have a friend look, or twist to catch your back in a second mirror. The fabric should move with you, not yank your shoulders back or gap at the collar. If reaching feels like a resistance band workout, the back panel is cut too narrow.
Movement lives in the upper back more than anywhere. A blazer that fails this test will annoy you every single time you drive, hug, or carry a tote.
12. Check Shoulder Seams Meet Shoulder Bones

Pay attention here. This is the one most people get wrong, and it is the one that cannot be fixed cheaply.
The shoulder seam has to land exactly at the edge of your shoulder bone, where your arm begins. Run your fingers along the top of your shoulder and feel for the bone, then check where the seam sits. If it hangs past onto your upper arm, the blazer is too big and will look like a hand-me-down forever. Digs inward and bunches the fabric? Too small.
Shoulder alterations are expensive and risky because the whole jacket is built off that line. A tailor can take in a waist for pocket change. Rebuilding a shoulder costs more than the blazer is usually worth. Get this right off the rack or walk away.
If the shoulders are wrong, nothing else matters. Everything hangs from that seam.
11. Raise Arms And Watch For Ride-Up

Raise both arms straight overhead. Now watch the body of the blazer in the mirror.
Every blazer rides up a little when you lift your arms, that is physics. What you are checking is how much, and whether it drags the whole front up with it. If the hem climbs to your ribs and the lapels buckle outward, the armhole is cut too low and too wide. A higher, cleaner armhole lets your arms move while the body stays put, which is why pricier tailoring moves better than fast fashion.
People test this standing and never reach up. Then they wear it to a wedding, lift a glass for the toast, and the thing bunches up to their chest all night.
10. Sit With The Closure Fastened

Clothes lie to you standing up. Sitting is where they confess.
Button the blazer and lower yourself into a chair the way you actually sit, not the cautious perch people adopt in dressing rooms. Look straight at the button. If a horizontal pull line fans out from it, or the fabric strains across your stomach, the jacket is too tight through the middle for real life. A little closeness standing becomes a problem seated, because your body widens when you sit.
This is a comfort test and a dignity test at once. Nobody wants to spend a dinner afraid to breathe. Give yourself room to exist in the thing.
9. Check The Seated Hem Avoids Bunching

While you are still seated, drop your eyes to the hem. Different check from the button, and people lump them together and miss it.
When you sit, the body of the blazer should fall and settle around your thighs without crumpling into a wad of fabric at the front. A hem that bunches and folds over your lap signals the jacket is too long in the body or too full through the hips for your frame. Smooth drape means the proportions are right for you.
Run your hand along the hem once seated. It should feel like it is resting, not fighting your legs for space.
8. Check Pockets Stay Flat And Level

Pockets tell on a bad fit faster than anything. Look at the hip pockets with your arms relaxed.
The flaps should lie flat and closed, sitting level with each other. If they splay open, pull apart, or gape at the outer edge, the blazer is too snug across your hips. Flaps that pucker inward can mean it is too loose. You want them resting like they are glued down, both at the same height.
Something most shoppers never notice: if the pockets are still basted shut with a loose thread, that is a sign of a better-made jacket. Snip them open at home, carefully, once you know it fits.
7. Inspect The Lining For Pulling Or Twisting

Open the blazer and look inside. The lining is the part nobody checks and the part that quietly wrecks the fit.
It should sit flat and smooth against the body of the jacket. See the lining twisting, bubbling, or pulling at the armholes and side seams? The two layers are fighting each other, and that tension telegraphs right through to the outside. A lining that bunches now will bunch worse after a dry clean.
Run your hand up the inside along the side seam. Smooth all the way means the construction is sound. Catches and ripples mean move on.
6. Ensure The Blazer Stays Centered While Moving

Take a walk. A real one, across the dressing room and back, arms swinging a little.
The blazer should stay balanced on your body, front edges hanging even, collar flat against your neck, back vents lying closed. If one side swings forward while the other lags, or the whole jacket drifts off center, the balance of the cut is off for your posture. If the back vents flare open with every step, the hips are too tight.
A blazer is armor you move in, not a photo prop. The way it behaves walking is the way you will experience it every day you own it.
5. Compare Open And Fastened Silhouettes

Last check, and it decides whether you will actually reach for this jacket. Look at yourself buttoned, then open, then buttoned again.
A good blazer earns its place both ways. Fastened, it should give you a clean waist and a defined line without strain across the chest or the button. Open, the front edges should fall straight and skim your body rather than flap wide or cave in. Works only one way? You have bought half a jacket.
Most of us wear a blazer open far more than closed, so be honest about which version you love. Buy the one that looks right the way you will truly wear it, and let the other way be a bonus.
The blazer you keep for fifteen years is the one that looked right the moment you stopped posing and just stood there.
4. Check Shoulder Seams Meet Shoulder Bones

This is the one almost everyone gets wrong, and it’s the single check that can’t be fixed later. The shoulder is the frame the whole jacket hangs off. If the seam droops past your shoulder bone, every other line goes down with it, and no tailor can rebuild a shoulder without basically remaking the blazer from scratch.
Stand straight, arm loose at your side, and run a finger down the seam. It should land right where your arm meets your body, on the bone — not sagging onto your upper arm, not pinching inward. See a little dent above the sleeve head? Too big. A seam that bites in? Too small.
Years ago I bought a gorgeous navy blazer with a half-inch of shoulder overhang and told myself I’d grow into it. Reader, I did not. It still looks borrowed.
3. Carry Your Handbag And Recheck Shoulder Stability

You won’t wear this blazer standing still in a soft-lit fitting room. You’ll wear it hauling a bag through a station, up stairs, into a meeting you’re already five minutes late for. So test it that way.
Sling your actual handbag over your shoulder — strap, weight, everything you really carry — and watch what the fabric does. A structured leather bag can drag a loose collar off your neck or crumple a too-big seam into a ripple. If the lapel pops away from your chest or the collar gaps, you’ve got too much room up top.
Most people skip this and find out on the sidewalk. Worst possible moment.
2. Recheck Wrinkles After Ten Minutes

A blazer lies to you in the first thirty seconds. Fresh off the hanger, every fabric behaves beautifully. Give it ten minutes and the truth comes out.
Button it and go about normal business — sit down, reach for your phone, cross your legs, walk a short lap. Then look again. Drag lines are the tell. Those little X-shaped wrinkles fanning out from the button mean it’s pulling across your bust or hips, and that’s a hard no. Horizontal creases across the back? Too tight through the shoulders.
Here’s what most people miss: natural fibers settle, synthetics seize up. A wool-blend relaxes into you. A stiff poly locks every crease in place and nags you about it all day long.
1. Photograph The Front, Side, And Back

Your eyes lie to you in a mirror. You see yourself face-on, suck in a little, angle for the flattering view. The camera doesn’t care about your angles — which is precisely why you need it.
Take three photos: front, full side profile, back. Then study them like you’re judging a complete stranger. The side shot tells you whether the hem balances front to back and whether the sleeve hangs clean. The back shot catches everything you literally cannot see in a mirror — the flaring vent, the bunching between your shoulder blades, the collar standing off your neck.
The back is where blazers quietly go wrong. A vent that splays open instead of lying flat means it’s snug through the hips, and you’d never catch it without a photo.
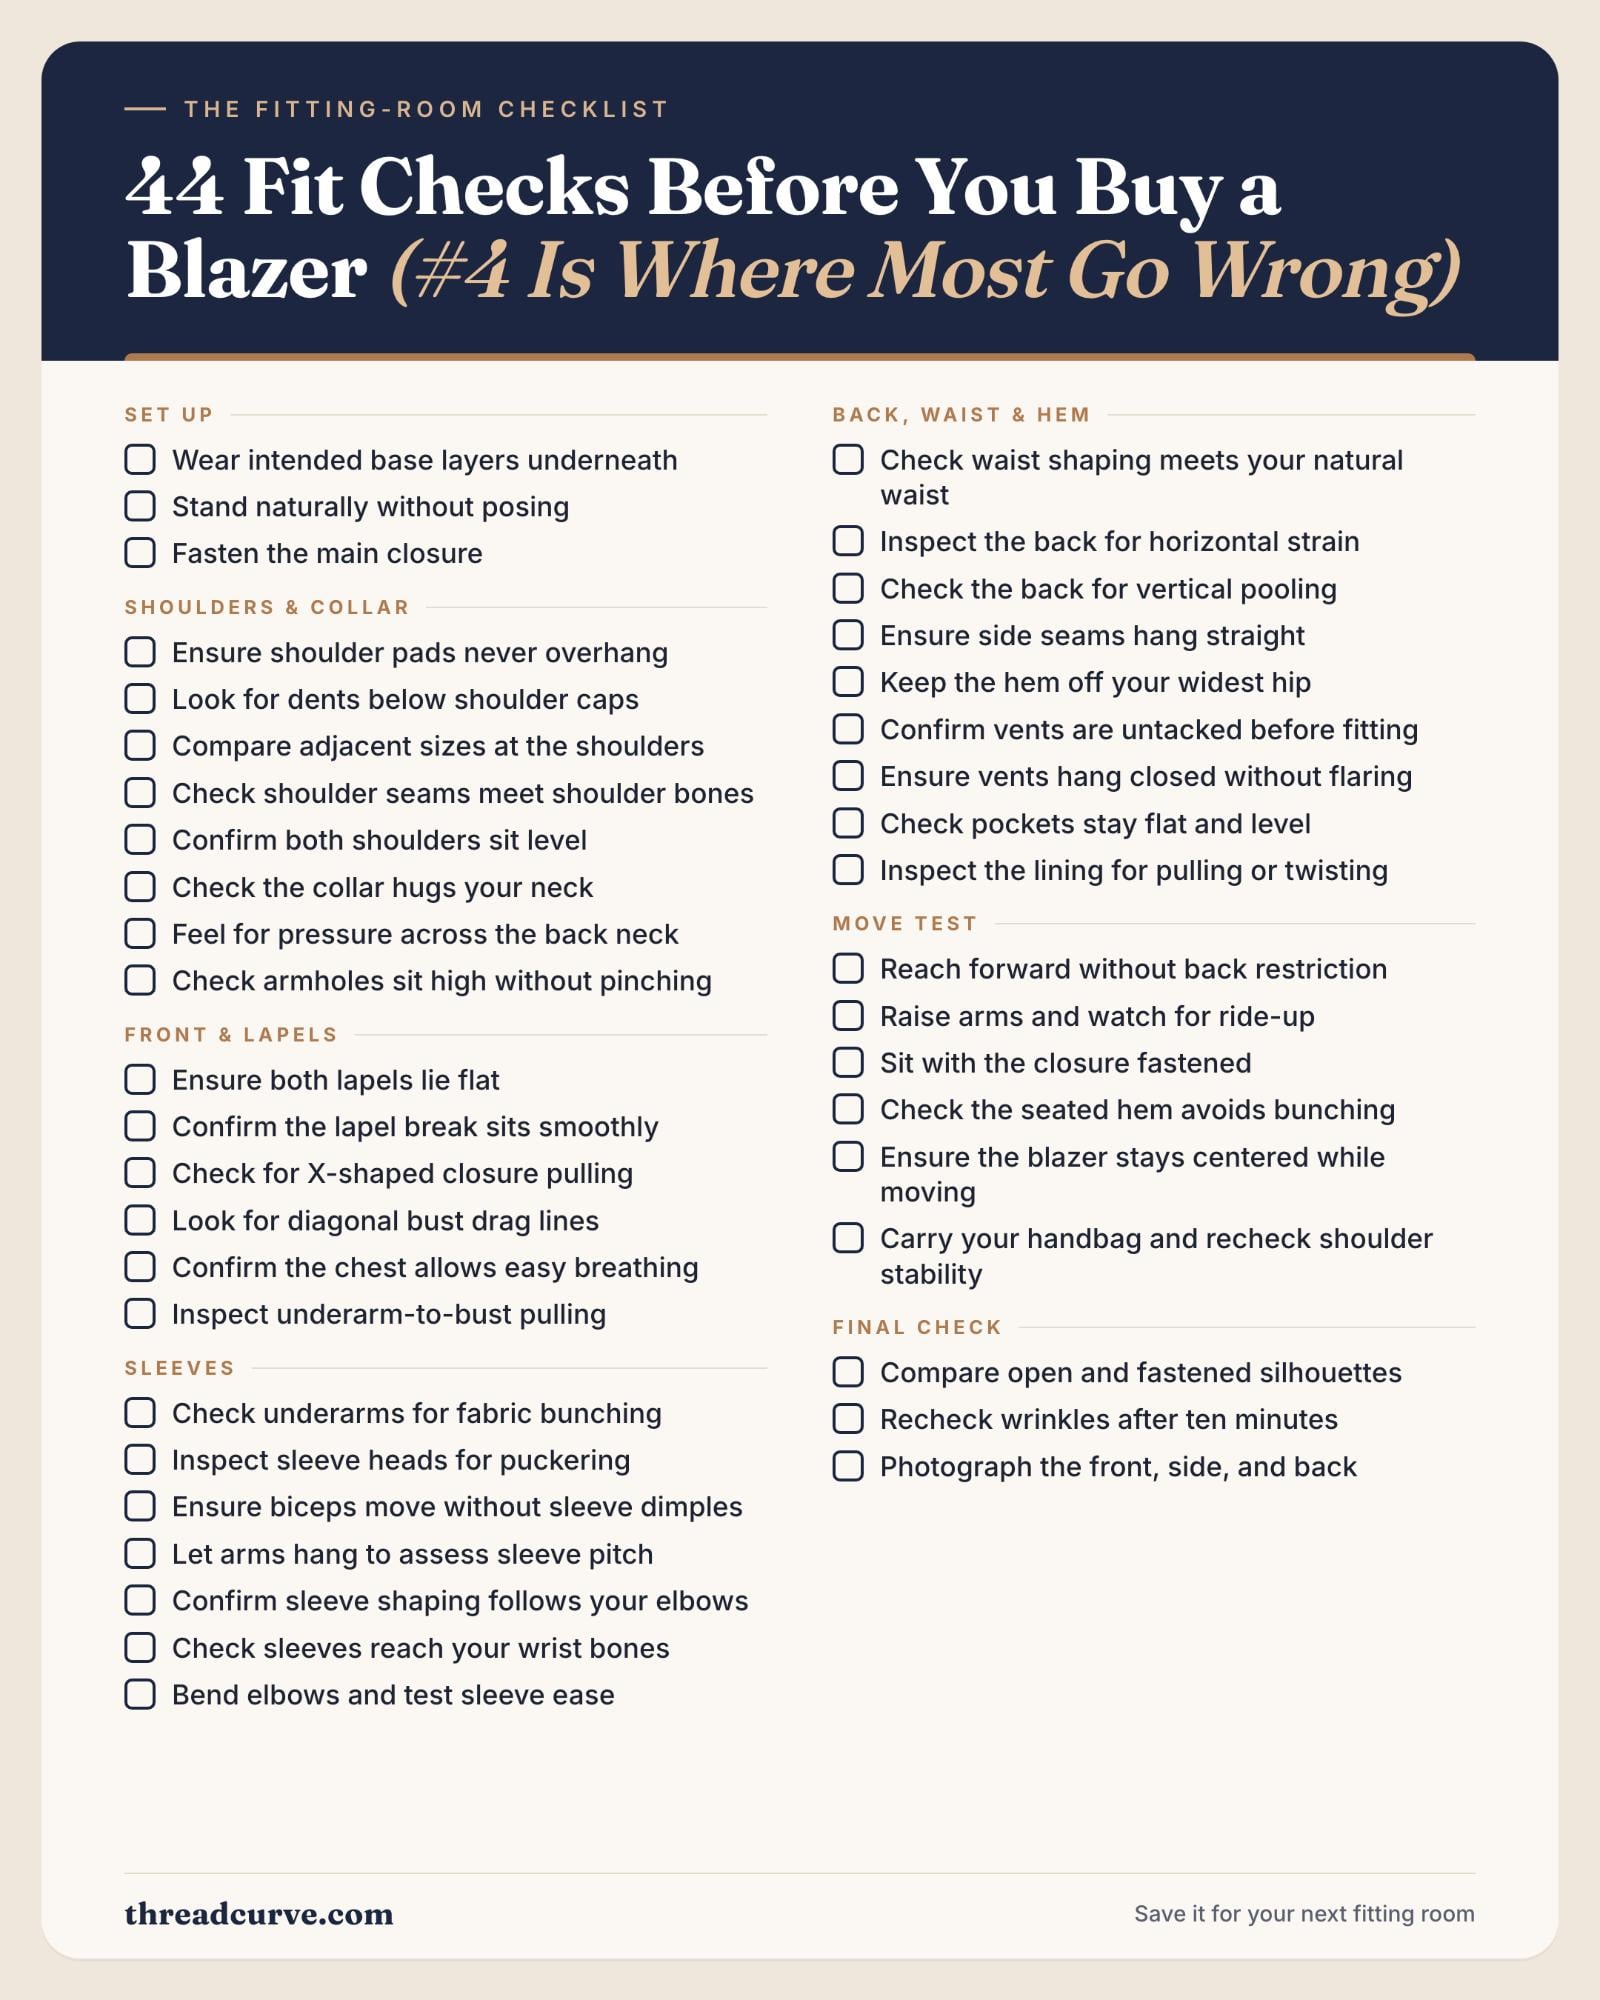
Your Printable Checklist
Save it to Pinterest or print it — every check from the list above on one page.